How T Build Crown Molding On Frameless Kitchen Cabinets / Crown Mouldings On Varying Cabinet Heights Stonehaven Life : Fasten the crown molding to the top of the cabinet (we used a brad nailer).
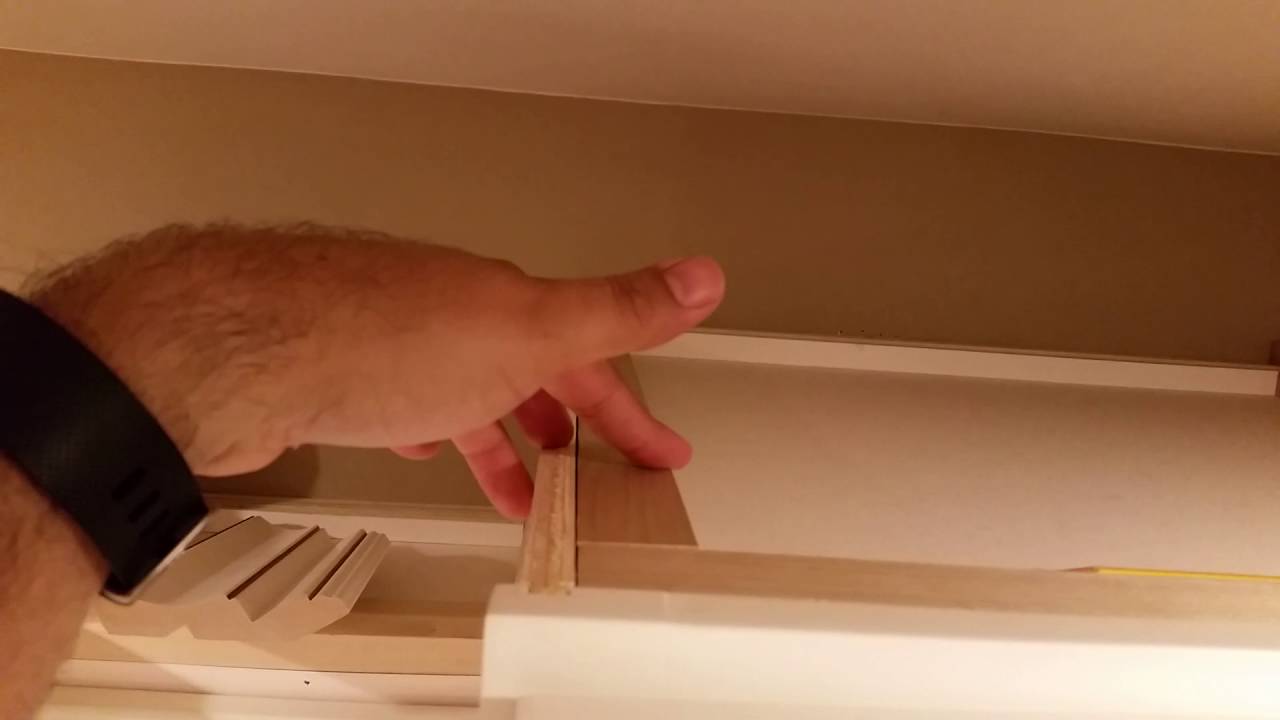
How T Build Crown Molding On Frameless Kitchen Cabinets / Crown Mouldings On Varying Cabinet Heights Stonehaven Life : Fasten the crown molding to the top of the cabinet (we used a brad nailer).. If you have soffits, you'll need to fasten the supports from inside the cabinets or glue and shim them in place with construction adhesive or silicone adhesive. This sounds more complicated than it is. If you must stick with that design, the white cabinet to the left must change in depth in order to change crown color there. I put on a flat apron piece the length of the upper cabinets flush with their top edge, shooting it on with nails at the top edge where the crown will cover the. The two side sections of crown molding only need angle cuts on one side;
To learn more about designing and building your own kitchen cabinets, check out brad's new popular woodworking university course, building frameless cabinets. This design shows crown molding on top of 36 tall uppers and a small space between the crown and ceiling. From the high spot, draw a level line 341/2on each wall where cabinets will be fastened. I'd change them both to white. Shop kitchen cabinetry and a variety of kitchen products online at lowes.com.
Diy Installing Large Crown Molding On Rta Kitchen Cabinets Youtube from i.ytimg.com If you must stick with that design, the white cabinet to the left must change in depth in order to change crown color there. Crown molding can either bond with the ceiling or allow for space above the cabinet. While building frameless cabinets isn't very difficult it is important that the cuts are accurate and the pieces as well as the assembly is square. That said, the total depth of my base cabinets including the door was about 24 deep and upper cabinets was about 13 ¾. Using frameless cabinets means that a sub‐crown molding will always have to be screwed to the top of the cabinet case to attach the crown molding to. Before you go crazy in your kitchen with a sledgehammer and order a large pile of plywood try to build one small cabinet to make sure you're happy with your results. For more information, visit www.titebond.com. They can be stained or painted, unlike some of the other crown molding materials.
Crown molding is decorative trim that is added to the top of your cabinets.
If you have soffits, you'll need to fasten the supports from inside the cabinets or glue and shim them in place with construction adhesive or silicone adhesive. If replacing the floor, remove old floor covering. Measure a piece of crown molding equal to the length of the cabinet. I'd change them both to white. A note about cabinet depth: Titebond no run, no drip wood glue provided by titebond. We wanted our crown to go almost to the ceiling, but not quite since the ceilings were not level, so we made the height 1″ shorter than the ceiling. I attach a 3/4 x 3 strip to the back of the crown, attached so that 1/4 of the crown molding protrudes down from the top of the cabinet. From the high spot, draw a level line 341/2on each wall where cabinets will be fastened. Fasten the crown molding to the top of the cabinet (we used a brad nailer). Among the most popular are: That 3/4 x 3 strip (with crown molding attached to the front) is secured with screws from the underside of the top of the cabinet. Construct elaborate crown molding by building up layers of inexpensive trim.
The upper rail is ripped wider to allow for a crown molding at the top, if desired. Use a pencil to mark the exact spot that needs to be cut. Cut crown molding for side of cabinet measure the length of the side pieces. If you must stick with that design, the white cabinet to the left must change in depth in order to change crown color there. Repeat this for the right side.
How To Build Frameless Wall Cabinets from 4.bp.blogspot.com I put on a flat apron piece the length of the upper cabinets flush with their top edge, shooting it on with nails at the top edge where the crown will cover the. Or else you can't do any crown molding at all. Lookingfor a special plans has never ever been. But, the black cabinets aren't really working at all. If you must stick with that design, the white cabinet to the left must change in depth in order to change crown color there. They can be stained or painted, unlike some of the other crown molding materials. Remove baseboard moldings and other objects on the wall where cabinets are to be installed. Place your tape measure on the edge of the crown and extend it to the length of one cabinet side.
While building frameless cabinets isn't very difficult it is important that the cuts are accurate and the pieces as well as the assembly is square.
The upper rail is ripped wider to allow for a crown molding at the top, if desired. Here is the same kitchen with a riser molding added below the crown molding, which takes the cabinets all the way to the ceiling. Crown molding is decorative trim that is added to the top of your cabinets. Measure a piece of crown molding equal to the length of the cabinet. There is a simple solution. If you must stick with that design, the white cabinet to the left must change in depth in order to change crown color there. I'd change them both to white. But, the black cabinets aren't really working at all. Frameless cabinets mouldings ikea kitchen kitchen cabinet crown molding diy kitchen cabinets crown molding kitchen cabinet remodel kitchen soffit ikea kitchen remodel. From the high spot, draw a level line 341/2on each wall where cabinets will be fastened. I put on a flat apron piece the length of the upper cabinets flush with their top edge, shooting it on with nails at the top edge where the crown will cover the. The riser molding is outlined in red. Using frameless cabinets means that a sub‐crown molding will always have to be screwed to the top of the cabinet case to attach the crown molding to.
Among the most popular are: The benefit of installing crown molding is that it draws the eye upward, showcasing the elegance of your cabinets. Before you go crazy in your kitchen with a sledgehammer and order a large pile of plywood try to build one small cabinet to make sure you're happy with your results. I put on a flat apron piece the length of the upper cabinets flush with their top edge, shooting it on with nails at the top edge where the crown will cover the. Measure a piece of crown molding equal to the length of the cabinet.
How To Build Frameless Wall Cabinets from 4.bp.blogspot.com Notice in the picture, the rails do not cover the face of the cabinet shelves. Then rip plywood down to an appropriate width that will be tall enough to mount the crown molding where you would like. Running crown at the top of frameless cabinets when they go to the ceiling has always been a challenge since ceilings go up and down and the doors under the crown go in a straight line. But it won't be an easy fix as any kitchen designer would tell you. Before you go crazy in your kitchen with a sledgehammer and order a large pile of plywood try to build one small cabinet to make sure you're happy with your results. I attach a 3/4 x 3 strip to the back of the crown, attached so that 1/4 of the crown molding protrudes down from the top of the cabinet. Or else you can't do any crown molding at all. Here is the same kitchen with a riser molding added below the crown molding, which takes the cabinets all the way to the ceiling.
Use a pencil to mark the exact spot that needs to be cut.
The only problem here is that when you are working with a full overlay door style, there isn't enough space at the front of the cabinet to nail the crown molding. The cabinet doors usually are flush with the bottom of the kitchen cabinet. If you must stick with that design, the white cabinet to the left must change in depth in order to change crown color there. Lookingfor a special plans has never ever been. Cut crown molding for side of cabinet measure the length of the side pieces. Running crown at the top of frameless cabinets when they go to the ceiling has always been a challenge since ceilings go up and down and the doors under the crown go in a straight line. Or else you can't do any crown molding at all. This sounds more complicated than it is. I attach a 3/4 x 3 strip to the back of the crown, attached so that 1/4 of the crown molding protrudes down from the top of the cabinet. Construct elaborate crown molding by building up layers of inexpensive trim. To learn more about designing and building your own kitchen cabinets, check out brad's new popular woodworking university course, building frameless cabinets. Frameless cabinets mouldings ikea kitchen kitchen cabinet crown molding diy kitchen cabinets crown molding kitchen cabinet remodel kitchen soffit ikea kitchen remodel. Use a pencil to mark the exact spot that needs to be cut.


No comments:
Post a Comment